
Provisioning a Cloud-Init VM
Proxmox allows you to create both Virtual Machines via QEMU, and Containers via LXC. Out of the box, LXC containers are much easier to provision, you download the template, create the CT and specify the username, password & IP address. Virtual machines take longer to provision, but are much more flexible in usage. One big benefit is live migration without downtime. A container must be restarted when migrating to a different node.
Cloud-Init is a feature that will speed up deployment of Linux-based virtual machines, allowing you to provision a VM as quickly as a CT. This guide will assume that you already have a Debian or Ubuntu Server guest installed inside a virtual machine, and that you have OpenSSH server installed.
Logging into the virtual machine
Confirming the IP address
If you are using DHCP, you may need to confirm which IP address has been given to the Virtual machine. To do this, log into the CLI and run the following command:
ip aThis should give an output similar to below. The address we are interested in is the inet address listed below ens18. In this case, the address is 192.168.1.187
1: lo: <LOOPBACK,UP,LOWER_UP> mtu 65536 qdisc noqueue state UNKNOWN group default qlen 1000
    link/loopback 00:00:00:00:00:00 brd 00:00:00:00:00:00
    inet 127.0.0.1/8 scope host lo
       valid_lft forever preferred_lft forever
    inet6 ::1/128 scope host
       valid_lft forever preferred_lft forever
2: ens18: <BROADCAST,MULTICAST,UP,LOWER_UP> mtu 1500 qdisc fq_codel state UP group default qlen 1000
    link/ether 4a:69:2e:94:d8:56 brd ff:ff:ff:ff:ff:ff
    inet 192.168.1.187/24 brd 192.168.1.255 scope global dynamic ens18
       valid_lft 86194sec preferred_lft 86194sec
    inet6 fe80::4869:2eff:fe94:d856/64 scope link
       valid_lft forever preferred_lft forever
SSH'ing into the machine
Then, ssh into your virtual machine:
ssh [email protected]Enabling root access
During the preparation process, we will need to remove the user created during installation. In order to do this, we will need to log into the virtual machine as the root user.
Setting the root password
Once successfully logged in, you will need to use this command to set a password for the root user. This password will be used for all VMs that use the Cloud-Init template, so it is best to use a secure one!
sudo passwd root(Optional) Enabling root ssh access
For security reasons, root SSH access is disabled by default. To make things easier, we can temporarily enable root SSH access by modifying the OpenSSH config file:
sudo nano /etc/ssh/sshd_configAdd this line at the top of the file:
PermitRootLogin yesThen save the file (Ctrl-S) and close Nano (Ctrl-X).
After saving the file, we will need to restart the SSH service for the changes to take affect:
sudo systemctl restart sshdNow, confirm that we can SSH into the machine using the root user:
ssh [email protected]Deleting the non-root user
Once we're logged in as root, we can remove the non-root user:
deluser --remove-home tempuserYou should see an output like below:
Looking for files to backup/remove ...
Removing user `tempuser' ...
Warning: group `tempuser' has no more members.
Done.
If you see an output like this, restart your virtual machine and try again:
userdel: user tempuser is currently used by process 1616
/usr/sbin/deluser: `/sbin/userdel tempuser' returned error code 8. Exiting.
We can then confirm that the user has been removed by checking the contents of /etc/passwd:
cat /etc/passwd | grep tempuserIf no output shows, you're good to go!
Installing apt packages
Required packages
We now need to install a couple of packages to allow the Virtual Machine to communicate with Proxmox via Cloud-Init.
apt install -y cloud-init cloud-initramfs-growroot qemu-guest-agent sudo git curlAdditional packages
At this point you now have all of the required packages, but to make the most out of a Cloud-Init VM, you should also install additional packages e.g. additional services or packages that will make your life easier! Here are some examples:
| Package name | Description |
| bmon | Bandwidth monitor graphs |
| htop | Terminal based task manager |
| iftop | Check network interface bandwidth |
| inetutils-traceroute | Traces path to a network host |
| iotop | Check disk IO usage |
| ncdu | Explore disk usage per folder |
| python3-pip | Allows installation of python3 based packages |
| screen | Detachable terminal sessions |
| tree | List contents of directories in a tree-like format |
(Optional) Installing Zabbix agent
If you use the Zabbix Monitoring system, installing the agent on a Cloud-Init will allow all new VMs to automatically communicate with the server.
Adding the Zabbix repository
The Zabbix agent packages included in most distributions aren't up to date. To download the newest version, visit the Zabbix website and select the appropriate distribution. In this example, here is the command for downloading the deb for Ubuntu 20.04:
wget https://repo.zabbix.com/zabbix/5.0/ubuntu/pool/main/z/zabbix-release/zabbix-release_5.0-1+focal_all.debOnce downloaded, use dpkg to install the package
dpkg -i zabbix-release_5.0-1+focal_all.debWe've just installed the Zabbix repository, but we'll need to run an apt update before installing the agent:
apt updateInstalling the agent
Once updated, we can install the Zabbix agent:
apt install zabbix-agentConfiguring the agent
Now, we need to modify the agent configuration file in order to tell it our Zabbix server's IP address. First, open the configuration file for editing:
nano /etc/zabbix/zabbix_agentd.confThen, find the Server= line and change the IP address to your Zabbix server's IP address:
Server=192.168.1.238Restarting the agent
For the changes to take affect, we must now restart the agent
systemctl restart zabbix-agentDisabling root SSH access
Once you're happy with the state of your Cloud-Init VM, you can revert the changes made to the OpenSSH server configuration file. To do this, open the file for editing:
nano /etc/ssh/sshd_configThen, comment out the line we added earlier. You can also remove the entire line, but commenting it out allows you to re-enable at a later date if required. The line should now look as follows:
#PermitRootLogin yesAfter the changes have been saved shutdown the machine. We will now add the final piece of the puzzle - the Cloud-Init drive!
Creating the Cloud-Init drive
The Cloud-Init drive is used by Proxmox to pass through initialisation parameters - the username, password, SSH key and IP address information to the guest VM. Without it, we can't complete the process.
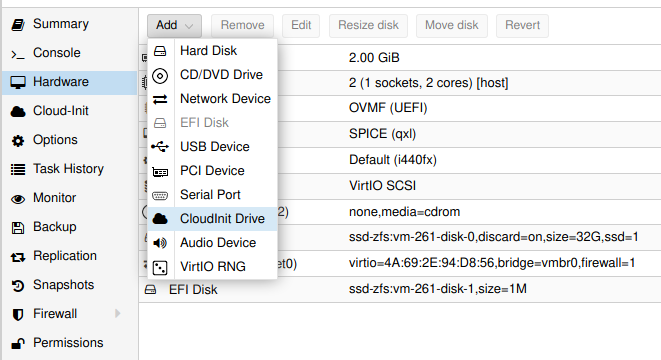
To add a Cloud-Init drive, go to the hardware section of the VM settings. Then click Add > CloudInit Drive
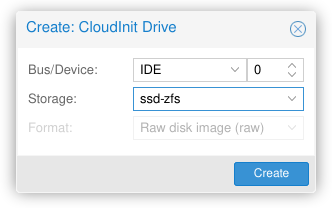
In the Create Window, choose the storage pool that you'd like to use for the CloudInit drive, then click Create.
Setting the Cloud-Init parameters
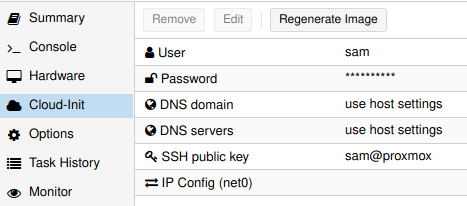
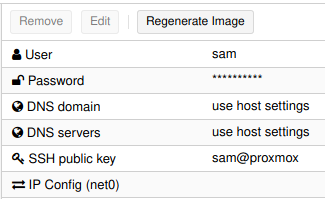
Now that we have a CloudInit drive, we can go to the Cloud-Init section and populate the fields:
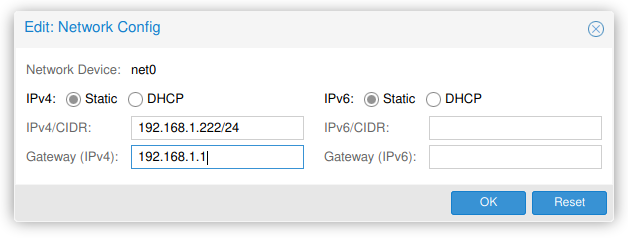
Under the IP config section, specify a Static IP address in CIDR notation (/24 for most home networks). Cloud-Init does support DHCP but currently encounters a bug where cloned VMs receive the same DHCP address.
Cloning the VM
After all Cloud-Init parameters are set, we can clone the Cloud-Init VM and give it a different VM ID and name.
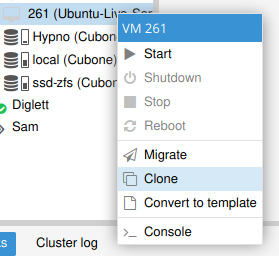
To clone the VM, right click on it and select Clone
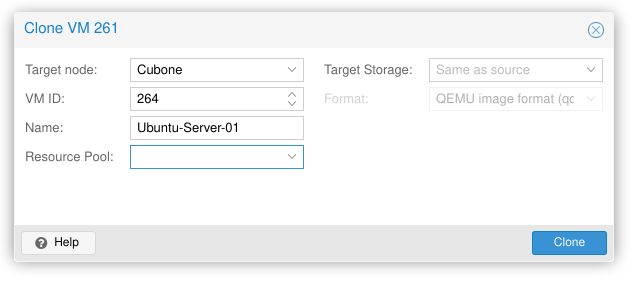
In the dialog box, set the ID and name for the new VM. Cloud-Init will use the name as it's hostname, so make sure this is unique and relates to the intended purpose of the VM.
Regenerating the image
On the new VM, go to the Cloud-Init tab and click Regenerate Image. This will tell the guest VM to re-initialise with the chosen hostname, user & IP address
No comments to display
No comments to display