When trying to install the Gandi certbot plugin on an Oracle Compute instance, I found that it gave errors relating to zope.interface. If you are using an Oracle Compute instance, follow these steps **before** installing the plugin.
First, remove the Ubuntu provided Python3 zope interface: ```shell sudo apt remove python3-zope.interface ``` Apt will mention that we now have packages that are no longer needed: ```shell Reading package lists... Done Building dependency tree Reading state information... Done The following packages were automatically installed and are no longer required: bc python3-automat python3-click python3-colorama python3-constantly python3-hamcrest python3-hyperlink python3-incremental python3-pyasn1 python3-pyasn1-modules python3-service-identity python3-twisted-bin python3-xkit ubuntu-drivers-common Use 'sudo apt autoremove' to remove them. ``` Let's run autoremove now: ```shell sudo apt autoremove ``` Make sure that pip3 doesn't have a zope interface installed: ```shell sudo pip3 uninstall zope.interface ``` Then, install the newest version of zope.interface (currently 5.3.0): ```shell sudo pip3 install zope.interface==5.3.0 ``` Once the above is completed, we are ready to install the gandi plugin! ##### Installing the plugin Once python3-pip is installed, we can install the plugin via this command: ```shell sudo pip3 install certbot-plugin-gandi ``` #### Configuring the plugin ##### Preparing the file structure We will now create a folder for Gandi within the Let's Encrypt folder: ```shell sudo mkdir -p /etc/letsencrypt/gandi ``` Use nano to create the configuration file for the gandi plugin ``` sudo nano /etc/letsencrypt/gandi/gandi.ini ``` Paste in the following: ```shell # live dns v5 api key dns_gandi_api_key= ``` ##### Retrieving your Gandi.net API key Now, [login](https://admin.gandi.net/?locale=en) to your Gandi.net account and click on the arrow to the right of your username, then click on **User Settings**: [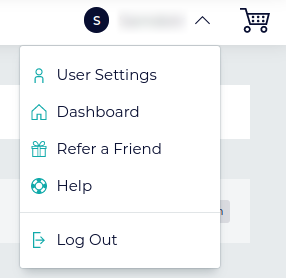](https://docs.sam.uk.com/uploads/images/gallery/2021-03/image-1616243156805.png) Once in user settings, click on **Manage the user account and security settings:** [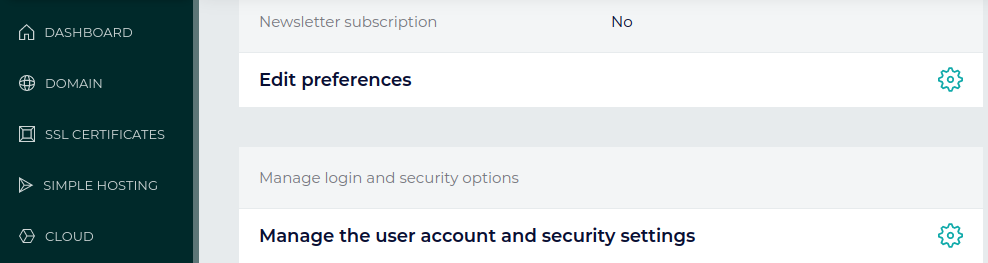](https://docs.sam.uk.com/uploads/images/gallery/2021-03/image-1616243279968.png) Go to the security section, and click on **Regenerate the API key**. The key will then appear on screen. Copy this to your clipboard. [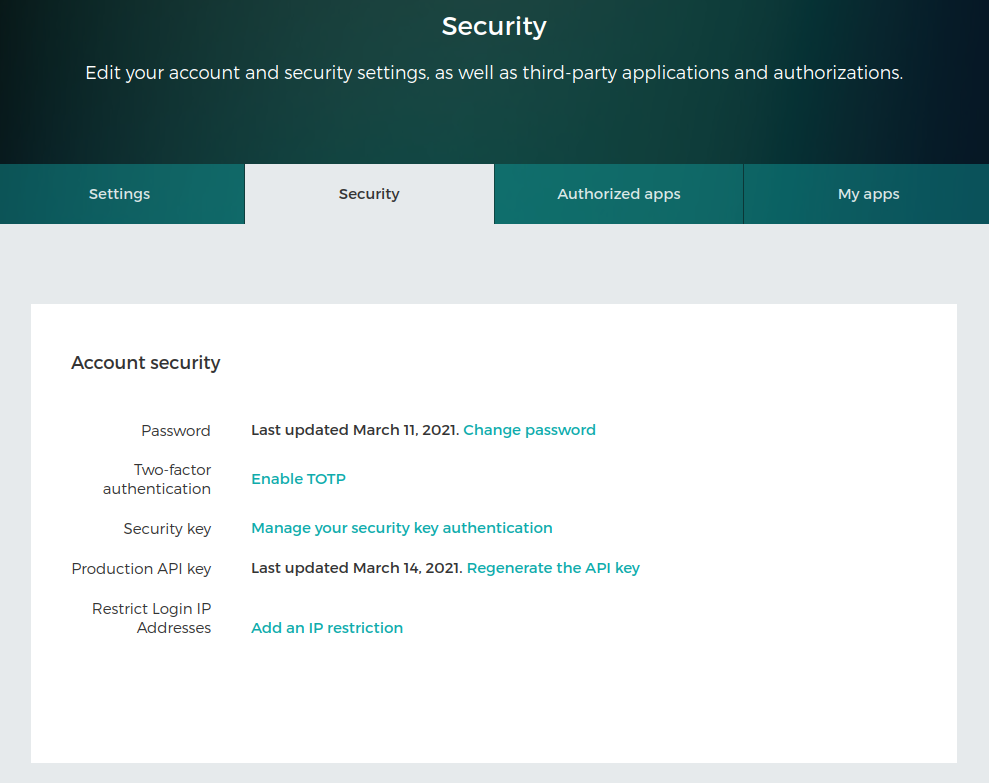](https://docs.sam.uk.com/uploads/images/gallery/2021-03/image-1616243470847.png) ##### Importing the API key Go back to your terminal, and paste the copied key, so your gandi.ini file should look as follows: ```shell # live dns v5 api key dns_gandi_api_key=YOUR_API_KEY_HERE ``` Once finished, save the file with Control-S, then quit nano with Control-C. ##### Securing the Gandi.ini file The gandi.ini file contains sensitive information (your Gandi.net API key) so it is best to change it's permissions so that only root can access it: ```shell sudo chmod 600 /etc/letsencrypt/gandi/gandi.ini ``` #### Generating the certificate Now that the gandi.ini file is configured, we can generate the certificate. The command differs slightly depending on whether you generate a wildcard certificate or not. Generating a wildcard certificate is recommended so that you can use it with multiple services via a reverse proxy. ##### Wildcard certificate ```shell sudo certbot certonly --authenticator dns-gandi --dns-gandi-credentials /etc/letsencrypt/gandi/gandi.ini -d YOUR.DOMAIN -d \*.YOUR.DOMAIN --server https://acme-v02.api.letsencrypt.org/directory ``` ##### Non-wildcard certificate ```shell sudo certbot certonly --authenticator dns-gandi --dns-gandi-credentials /etc/letsencrypt/gandi/gandi.ini -d YOUR.DOMAIN ``` Once run, certbot will ask for an email address (to let you know when your certificate is due to expire and any security notices). After the certificate has been generated, it will tell you where the certificate chain and private key are located. Your web servers will need to point to these in order to deliver HTTPS pages securely! ```shell IMPORTANT NOTES: - Congratulations! Your certificate and chain have been saved at: /etc/letsencrypt/live/YOUR.DOMAIN/fullchain.pem Your key file has been saved at: /etc/letsencrypt/live/YOUR.DOMAIN/privkey.pem ``` #### Automating renewal We have now generated a Let's Encrypt certificate! But how to we automatically renew it when it expires in 90 days? The answer: cron jobs. ##### Editing the crontab First, open crontab using your preferred editor: ```shell sudo crontab -e ``` ##### Adding the renew command Then, paste this at the end of the file: ```shell 0 0 * * 0 certbot renew -q --authenticator dns-gandi --dns-gandi-credentials /etc/letsencrypt/gandi/gandi.ini --server https://acme-v02.api.letsencrypt.org/directory ``` # Installing CA Certificates When using a school or work network, you may be required to install a Root CA certificate to allow you to browse to secure websites (those that use HTTPS, which includes most websites nowadays!). The Root CA certificate is required because the traffic is being decrypted by the firewall or filter, then re-encrypted. Internet browsers will rightly detect this as a man-in-the-middle (MITM) attack, and will therefore throw up errors preventing you from continuing to load the page.Installing the required CA certificate will remove certificate errors, but you must be aware that this means **all** traffic will be viewable by your school or employer.
##### Copying the certificate Ubuntu looks in specific folders for CA certificates. The exact location depends on the version - to do this on 20.04 (Focal) you will need to use a command similar to this. This copies the CA and changes it's extension from .cer (or .crt) to .pem: ```shell sudo cp mycert.cer /usr/share/ca-certificates/local/mycert.pem ```Older versions of Ubuntu may look in the following locations
`/usr/share/ca-certificates/` `/usr/local/share/ca-certificates/` ##### Enabling the certificate Our certificate is now within one of the required locations, but due to the nature of certificate trust, we will need to enable it via dpkg: ```shell sudo dpkg-reconfigure ca-certificates ``` ##### Updating the certificate cache After enabling the certificate via dpkg, we must run the update-ca-certificates comand ```shell sudo update-ca-certificates ``` ##### Configuring git to use the certificate Git has a separate setting for CA certificates, so we must set it using this command: ```shell git config --global http.sslCAInfo /usr/share/ca-certificates/mycert.pem ``` # Setting up an NGINX Reverse Proxy with SSL A reverse proxy is a function of a web server that allows it to forward requests onto other web servers. Typically they are set up in combination with a wildcard SSL certificate, allowing each subdomain to go to a different server. Apache2 and NGINX can both function as reverse proxies, but NGINX is much easier to set up! #### Installing NGINX ##### Install using apt First, install nginx using apt: ```shell sudo apt install nginx ``` ##### Testing with telnet Telnet is great for testing TCP ports. NGINX listens on TCP port 80 by default, so we can test it with telnet: ```C telnet 127.0.0.1 80 ``` If the server is responding correctly, you should see an output similar to below: ```C Trying 127.0.0.1... Connected to 127.0.0.1. Escape character is '^]'. ``` #### Configuring NGINXNGINX configuration files are stored in /etc/nginx/ - the site configuration files are stored in sites-available/, then these are enabled by creating a symbolic link to them in sites-enabled/
##### Disabling the default site configuration file Now that we know the server is running, we are going to disable the default NGINX configuration file. This is so that we can create a new one that is more focused around the reverse proxy abilities of NGINX. To remove the default configuration file, run this command: ```shell sudo rm /etc/nginx/sites-enabled/default ``` Creating a new site configuration file We will now create a new site configuration file, using our domain name as the file name: ```shell sudo nano /etc/nginx/sites-available/YOUR.DOMAIN ``` Here is an example template, which retains NGINX's default site configuration for the root domain and does reverse proxy for a subdomain to a Proxmox server: ```Nginx # We are defining our Let's Encrypt certificate here # If your NGINX server will serve multiple domains, you will instead need to place it within the 443 definition ssl_certificate /etc/letsencrypt/live/YOUR.DOMAIN/fullchain.pem; ssl_certificate_key /etc/letsencrypt/live/YOUR.DOMAIN/privkey.pem; # Required when reverse proxying to a Proxmox server map $http_upgrade $connection_upgrade { default upgrade; '' close; } # This will forward all HTTP requests to HTTPS server { listen 80; listen [::]:80; server_name *.YOUR.DOMAIN; rewrite ^ https://$host$request_uri? permanent; } # This will serve NGINX's default web page, via HTTPS server { listen 443 ssl; listen [::]:443 ssl; server_name YOUR.DOMAIN; # Define the web root root /var/www/html; # Add index.php to the list if you are using PHP index index.html index.htm index.nginx-debian.html; location / { # First attempt to serve request as file, then # as directory, then fall back to displaying a 404. try_files $uri $uri/ =404; } } # This subdomain will reverse proxy requests to a Proxmox web interface server { listen 443 ssl; listen [::]:443 ssl; server_name proxmox.YOUR.DOMAIN; location / { proxy_pass https://YOUR.PROXMOX.IP.ADDRESS:8006; proxy_set_header Upgrade $http_upgrade; proxy_set_header Connection "upgrade"; } } ``` Once modified to suit your setup, use Control-S to save and Control-C to quit nano. ##### Enabling the new configuration file We now have a new configuration file, and we are going to enable it by creating a symbolic link: ```shell sudo ln -s /etc/nginx/sites-available/YOUR.DOMAIN /etc/nginx/sites-enabled/YOUR.DOMAIN ``` #### Testing the configuration We can now run nginx -t in order to test the new configuration file: ```shell sudo nginx -t ``` Assuming all is well, you should see an output similar to below: ```shell nginx: the configuration file /etc/nginx/nginx.conf syntax is ok nginx: configuration file /etc/nginx/nginx.conf test is successful ``` #### Restarting NGINX Once we've confirmed that the configuration file tests successfully, we can apply it by restarting the NGINX service: ```shell sudo systemctl restart nginx ``` #### Testing port 443 with telnet We already know that NGINX was listening on TCP port 80, but since we have just enabled SSL, we want to make sure that it's also listening on port 443: ```C telnet 127.0.0.1 443 ``` The output should be similar to before: ```C Trying 127.0.0.1... Connected to 127.0.0.1. Escape character is '^]'. ``` # Do balance-alb and balance-tlb support fault tolerance? Bonding Mode 5 (balance-tlb) works by looking at all the devices in the bond, and sending out the slave with the least current traffic load. Traffic is only received by one slave (the "primary slave"). If a slave is lost, that slave is not considered for transmission, so this mode is fault-tolerant. Bonding Mode 6 (balance-alb) works as above, except incoming ARP requests are intercepted by the bonding driver, and the bonding driver generates ARP replies so that external hosts are tricked into sending their traffic into one of the other bonding slaves instead of the primary slave. If many hosts in the same broadcast domain contact the bond, then traffic should balance roughly evenly into all slaves. If a slave is lost in Mode 6, then it may take some time for a remote host to time out its ARP table entry and send a new ARP request. A TCP or SCTP retransmission tents to lead into ARP request fairly quickly, but a UDP datagram does not, and will rely on the usual ARP table refresh. So Mode 6 is fault tolerant, but convergence on slave loss may take some time depending on the Layer 4 protocol used. If you are worried about fast fault tolerance, then consider using Mode 4 (802.3ad aka LACP) which negotiates link aggregation between the bond and the switch, and constantly updates the link status between the aggregation partners. Mode 4 also has configurable load balance hashing so is better for in-order delivery of TCP streams compared to Mode 5 or Mode 6. If this bond will be bridged to virtual machines, then you cannot use Mode 5 or Mode 6 due to MAC rewriting behaviour of both modes under certain conditions, and doubly so due to the ARP intercept behaviour of Mode 6. All modes 0 to 4 will work with VM bridges, but 0 (round-robin) and 3 (broadcast) are probably not suitable for most workloads, definitely not for TCP and SCTP streams. All modes 0 to 4 require switch config, except Mode 1 (active-backup). # Installing and configuring Lego ACME client Lego is a Let's Encrypt ACME client written in Go that supports APIs provided by many DNS providers. I find it easier to install and use compared to the official Let's Encrypt certbot client. #### Installing Lego Lego is hosted on GitHub. Check their [releases page](https://github.com/go-acme/lego/releases) for the latest version. As of writing the current version is 4.4.0, so this can be downloaded via: ```shell wget https://github.com/go-acme/lego/releases/download/v4.4.0/lego_v4.4.0_linux_amd64.tar.gz ``` The download is a gzip compressed tar file, so we will need to run these commands to extract it: ```shell gzip -d lego_v4.4.0_linux_amd64.tar.gz && tar -xvf lego_v4.4.0_linux_amd64.tar ``` Lego is an executable file, but if it's not located within /bin or /usr/bin, we will need to specify the full path later. This can be remedied by moving it to /usr/bin: ```shell sudo mv lego /usr/bin/ ``` #### Requesting your certificates ##### Creating the script First, we will use nano to create a new file within /usr/bin: ```shell sudo nano /usr/bin/request-certs-lego ``` Then, paste in the following code: ```shell #!/bin/bash mkdir -p /etc/lego GANDIV5_API_KEY=YOUR-KEY-HERE \ lego --email="someone@example.com" --path="/etc/lego" -a --dns gandiv5 -d YOUR.DOMAIN -d \*.YOUR.DOMAIN run systemctl restart nginx ``` Now, modify the email and domain fields to match your setup. If you have multiple domains, copy the whole line and populate it with the other domain. ##### Retrieving your Gandi.net API key Now, [login](https://admin.gandi.net/?locale=en) to your Gandi.net account and click on the arrow to the right of your username, then click on **User Settings**: [](https://docs.sam.uk.com/uploads/images/gallery/2021-03/image-1616243156805.png) Once in user settings, click on **Manage the user account and security settings:** [](https://docs.sam.uk.com/uploads/images/gallery/2021-03/image-1616243279968.png) Go to the security section, and click on **Regenerate the API key**. The key will then appear on screen. Copy this to your clipboard. [](https://docs.sam.uk.com/uploads/images/gallery/2021-03/image-1616243470847.png) Copy the API key you see here into the key field within the script. ##### Making the script executable For security reasons, Linux won't let you run a bash script without first modifying it to make it executable. To do this, we will use chmod: ```shell sudo chmod +x /usr/bin/request-certs-lego ``` ##### Running the script Now, we can run the script as root: ```shell sudo request-certs-lego ``` You should see an output similar to this: (EXAMPLE OUTPUT) #### Using the certificates If your website was previously set to use the certbot plugin or other SSL provider, you will need to modify the website definitions to point to the new Lego certificates, here's an example for NGINX: ``` ssl_certificate /etc/lego/certificates/YOUR.DOMAIN.crt; ssl_certificate_key /etc/lego/certificates/YOUR.DOMAIN.key; ``` #### Renewing the certificates ##### Creating the renewal script As with the request script, we will use nano to create a new file within /usr/bin: ```shell sudo nano /usr/bin/renew-certs-lego ``` Paste in the following code, modifying to match your email address & domains: ```shell #!/bin/bash GANDIV5_API_KEY=YOUR-KEY-HERE \ lego --email="someone@example.com" --path="/etc/lego" -a --dns gandiv5 -d YOUR.DOMAIN -d \*.YOUR.DOMAIN renew systemctl restart nginx ``` ##### Making the script executable For security reasons, Linux won't let you run a bash script without first modifying it to make it executable. To do this, we will use chmod: ```shell sudo chmod +x /usr/bin/renew-certs-lego ``` ##### Running the script Now, we can run the script as root: ```shell sudo renew-certs-lego ``` #### Automating renewal with cron Now that we've confirmed the renewal script is working, we can call it via cron.d to make it run every month. To do this, we need to create a new file under /etc/cron.d/ ```shell sudo nano /etc/cron.d/lego-cert-renewal ``` Once nano is opened, paste in the following line: ```shell 0 1 1 * * root /usr/bin/renew-certs-lego > /root/renew-certs-lego-log 2>&1 ``` 0 means 0 minutes 1 means the first hour 1 means the first day of the month \* means every month \* means every year root is the user the script will run as > /root/renew-certs-lego-log is the location of the log file 2>&1 directs the output of the cron job to the log file # Email output from cron job Ubuntu # Boot stuck at "A start job is running for Create Volatile Files and Directories" This message will appear when the /tmp directory is full or has too many files/directories inside it. Since it prevents a successful boot, we will need to modify the boot options to fix it First, restart the affected system (Ctrl-Alt-Del or power cycle it) and upon reaching Grub, press the E key to begin editing the boot option Scroll to the bottom and find the section including root=/\* and "ro". This is the area we will be editing. Server versions of Ubuntu normally mention "maybe-ubiquity" after this, whereas desktop versions normally include "quiet splash" [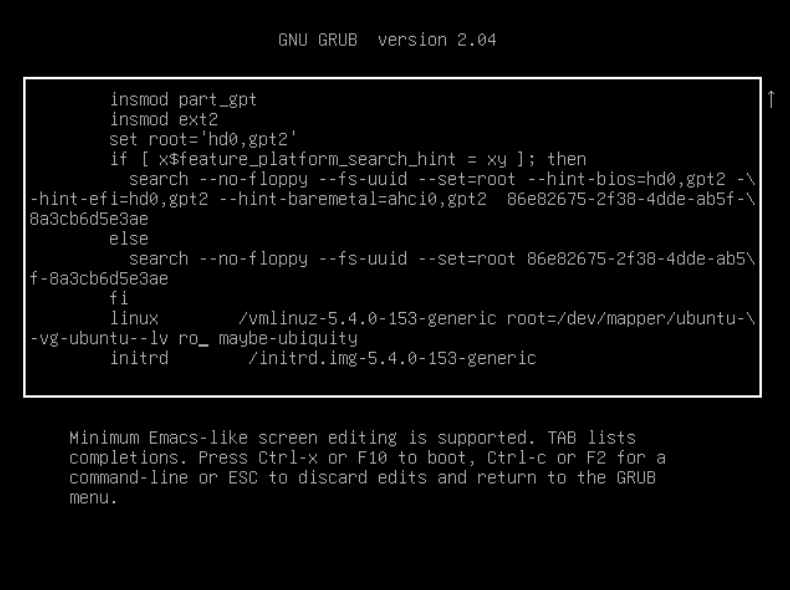](https://docs.sam.uk.com/uploads/images/gallery/2023-07/image-1688565901518.png) Change the "ro" (read-only) to "rw" (read-write) and add init=/bin/bash after it (ensuring there's a double space after rw) [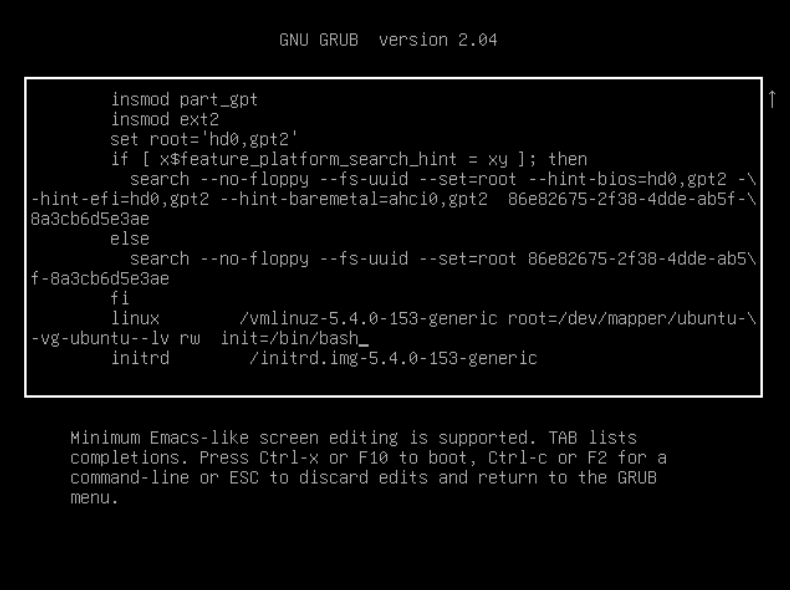](https://docs.sam.uk.com/uploads/images/gallery/2023-07/image-1688565916561.png) Now we're effectively running in single-user (root) mode. We can now run the commands needed to reset the /tmp directory: Move the existing directory: mv /tmp /old.tmp Make a new directory: mkdir /tmp Set the correct permissions: chmod 1777 /tmp Now we can reboot. The normal "reboot" command doesn't work in this mode, so a Ctrl-Alt-Del is the easiest way!