# Proxmox VE
Test
# Resizing (or removing) Local-LVM
[](https://docs.sam.uk.com/uploads/images/gallery/2021-03/proxmox-resize-lvm.png)
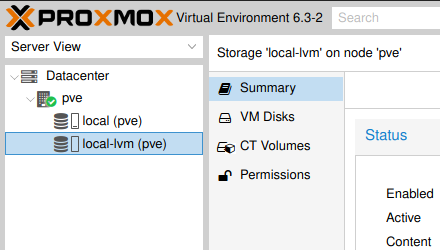
When installing Proxmox to an ext4 volume, the installer assigns the majority of your boot disk to "Local-LVM". This may not be desirable if you plan on using a secondary disk for VM storage, and would like to store more ISO images and backups in the root volume (known in Proxmox as "Local").
First, run lvdisplay (**L**ogical **V**olume display) as root to check the current layout:
```shell
root@pve:~# lvdisplay
--- Logical volume ---
LV Path /dev/pve/swap
LV Name swap
VG Name pve
LV UUID DkDV6A-7iqo-70kO-i9Gx-d9qo-XaCu-VUCAYb
LV Write Access read/write
LV Creation host, time proxmox, 2021-03-13 22:40:36 +0000
LV Status available
# open 2
LV Size 8.00 GiB
Current LE 2048
Segments 1
Allocation inherit
Read ahead sectors auto
- currently set to 256
Block device 253:0
--- Logical volume ---
LV Path /dev/pve/root
LV Name root
VG Name pve
LV UUID pqcv3c-Csis-fBqQ-ARkb-3xzo-7xau-DaRzxT
LV Write Access read/write
LV Creation host, time proxmox, 2021-03-13 22:40:37 +0000
LV Status available
# open 1
LV Size 58.00 GiB
Current LE 14848
Segments 1
Allocation inherit
Read ahead sectors auto
- currently set to 256
Block device 253:1
--- Logical volume ---
LV Name data
VG Name pve
LV UUID tyoWtm-fyEr-PqRg-5Sn2-dcTq-tE69-qKHprl
LV Write Access read/write
LV Creation host, time proxmox, 2021-03-13 22:40:37 +0000
LV Pool metadata data_tmeta
LV Pool data data_tdata
LV Status available
# open 0
LV Size <147.38 GiB
Allocated pool data 0.00%
Allocated metadata 1.08%
Current LE 37728
Segments 1
Allocation inherit
Read ahead sectors auto
- currently set to 256
Block device 253:4
```
Based on the above output, we see that pve-data (local-lvm in the Proxmox GUI) is almost 3 times the size of the root volume. To resize this, you will first need to remove it. This will delete all contents of local-lvm, so please back up any virtual machines and remove them first so you don't lose anything!
```shell
root@pve:~# lvremove /dev/pve/data -y
Logical volume "data" successfully removed
```
**Optional** - If you still require a local-lvm partition (but want to give it less space) you can recreate it with the following command (in this example, 40G is specified to give it 40 Gibibytes).
```shell
root@pve:~# lvcreate -L 40G -n data pve -T
Thin pool volume with chunk size 64.00 KiB can address at most 15.81 TiB of data.
Logical volume "data" created.
```
The logical volume for root can then be resized to give it all available free space:
```shell
root@pve:~# lvresize -l +100%FREE /dev/pve/root
Size of logical volume pve/root changed from 58.00 GiB (14848 extents) to 224.38 GiB (57442 extents).
Logical volume pve/root successfully resized.
```
Once the logical volume has been resized, the ext4 partition must also be resized using **resize2fs**:
```shell
root@pve:~# resize2fs /dev/mapper/pve-root
resize2fs 1.44.5 (15-Dec-2018)
Filesystem at /dev/mapper/pve-root is mounted on /; on-line resizing required
old_desc_blocks = 8, new_desc_blocks = 29
The filesystem on /dev/mapper/pve-root is now 58820608 (4k) blocks long.
```
Once resized, run lvdisplay again to verify the changes have taken effect.
```shell
root@pve:~# lvdisplay
--- Logical volume ---
LV Path /dev/pve/swap
LV Name swap
VG Name pve
LV UUID DkDV6A-7iqo-70kO-i9Gx-d9qo-XaCu-VUCAYb
LV Write Access read/write
LV Creation host, time proxmox, 2021-03-13 22:40:36 +0000
LV Status available
# open 2
LV Size 8.00 GiB
Current LE 2048
Segments 1
Allocation inherit
Read ahead sectors auto
- currently set to 256
Block device 253:0
--- Logical volume ---
LV Path /dev/pve/root
LV Name root
VG Name pve
LV UUID pqcv3c-Csis-fBqQ-ARkb-3xzo-7xau-DaRzxT
LV Write Access read/write
LV Creation host, time proxmox, 2021-03-13 22:40:37 +0000
LV Status available
# open 1
LV Size 224.38 GiB
Current LE 57442
Segments 1
Allocation inherit
Read ahead sectors auto
- currently set to 256
Block device 253:1
```
Then, log into the Proxmox GUI and go to **Datacenter** > **Storage** and remove the **local-lvm** entry:
[](https://docs.sam.uk.com/uploads/images/gallery/2021-03/image-1615749924702.png)
# Configuring Proxmox to use NAT Networking
By default, Proxmox configures your primary NIC (Network Interface Card) to work in bridged mode. For normal installations, this is the best configuration - VMs and CTs that you create automatically get assigned a DHCP address from your router so can easily access your local network.
In some cases however, bridged networking may be unsuitable (if you are connected to a local network with a low number of free IP addresses) or impossible to use. Many Dedicated Server providers say that you need to purchase a secondary external IP address in order to run Proxmox in bridged mode. With NAT mode you can get away with only using a single external IP address.
#### Creating the NAT network
##### Modifying the /etc/network/interfaces file
First, ssh into your Proxmox node and make a copy of the interfaces file as below. We're going to be making significant changes to it, so making a backup will make it easier to revert if something goes wrong:
```shell
cp /etc/network/interfaces /etc/network/interfaces.old
```
Then open /etc/network/interfaces in your preferred text editor:
```shell
nano /etc/network/interfaces
```
Here is the standard Proxmox interfaces file - yours will look similar to this, the iface will depend on your hardware (in this example **enp2s0**) and IP address will be the one set during installation.
```C
auto lo
iface lo inet loopback
iface enp2s0 inet manual
auto vmbr0
iface vmbr0 inet static
address 192.168.1.253/24
gateway 192.168.1.1
bridge_ports enp2s0
bridge_stp off
bridge_fd 0
```
Here is an example of the required interface file for NAT networking. The external IP address definition is moved from vmbr0 to enp2s0, and vmbr0 is renamed to vmbr1. vmbr1 is given an IP address in a different subnet and has bridge-ports set to none. You can use any subnet within the internal IP address space, but make sure it's different to the subnet used in your "external" network. In the below example, my "external" network lies in the 192.168.1.x address space, and I used 10.10.10.x as the NAT subnet.
```C
auto lo
iface lo inet loopback
auto enp2s0
iface enp2s0 inet static
address 192.168.1.253/24
gateway 192.168.1.1
auto vmbr1
iface vmbr1 inet static
address 10.10.10.1/24
bridge-ports none
bridge-stp off
bridge-fd 0
pre-up iptables-restore < /etc/iptables.conf
post-up iptables -t nat -A POSTROUTING -s '10.10.10.0/24' -o enp2s0 -j MASQUERADE && iptables -t raw -I PREROUTING -i fwbr+ -j CT --zone 1
pre-down iptables-save > /etc/iptables.conf
post-down iptables -t nat -D POSTROUTING -s '10.10.10.0/24' -o enp2s0 -j MASQUERADE
```
##### Enabling IP Forwarding
The post-up and post-down definitions are required to allow VMs and CTs to access the external network. They won't function however without modifying /etc/sysctl.conf - open it in your preferred text editor:
```shell
nano /etc/sysctl.conf
```
Once opened, find this line and uncomment it: (**net.ipv4.ip\_forward=1**)
```shell
# Uncomment the next line to enable packet forwarding for IPv4
net.ipv4.ip_forward=1
```
Reboot the Proxmox node
```shell
reboot
```
Once rebooted, create you can start creating VMs or CTs.
#### Connecting your Virtual Machines and LXC Containers to the NAT network
##### LXC Containers (CTs)
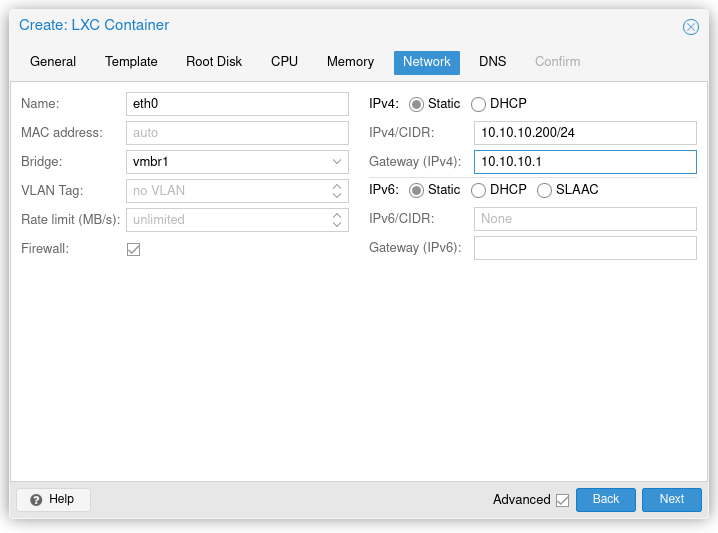
For LXC Containers, the bridge selected under the Network tab should default to vmbr1. Select Static in the IPv4 section and specify an address within the subnet you chose earlier. Enter vmbr1's IP address in the gateway field.
[](https://docs.sam.uk.com/uploads/images/gallery/2021-03/image-1615759872037.png)
Assuming you configured things correctly, the CT should now have outbound network access! A quick ping will confirm this:
```shell
root@Ubuntu-20-04-CT:~# ping google.com
PING google.com (172.217.169.14) 56(84) bytes of data.
64 bytes from lhr25s26-in-f14.1e100.net (172.217.169.14): icmp_seq=1 ttl=115 time=22.7 ms
64 bytes from lhr25s26-in-f14.1e100.net (172.217.169.14): icmp_seq=2 ttl=115 time=22.4 ms
64 bytes from lhr25s26-in-f14.1e100.net (172.217.169.14): icmp_seq=3 ttl=115 time=23.0 ms
64 bytes from lhr25s26-in-f14.1e100.net (172.217.169.14): icmp_seq=4 ttl=115 time=22.9 ms
^C
--- google.com ping statistics ---
4 packets transmitted, 4 received, 0% packet loss, time 3002ms
rtt min/avg/max/mdev = 22.444/22.766/22.992/0.211 ms
```
##### QEMU Virtual Machines (VMs)
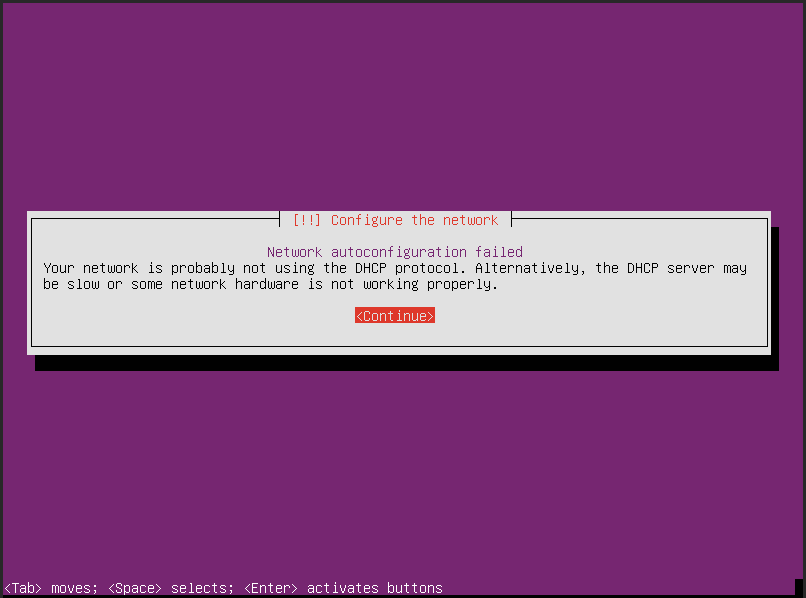
Proxmox QEMU VMs will also use vmbr1 as their network interface. Unlike containers, the Operating System itself will need to lease it's IP address. Proxmox doesn't contain a DHCP server, so network autoconfiguration will fail:
[](https://docs.sam.uk.com/uploads/images/gallery/2021-03/image-1615760500468.png)
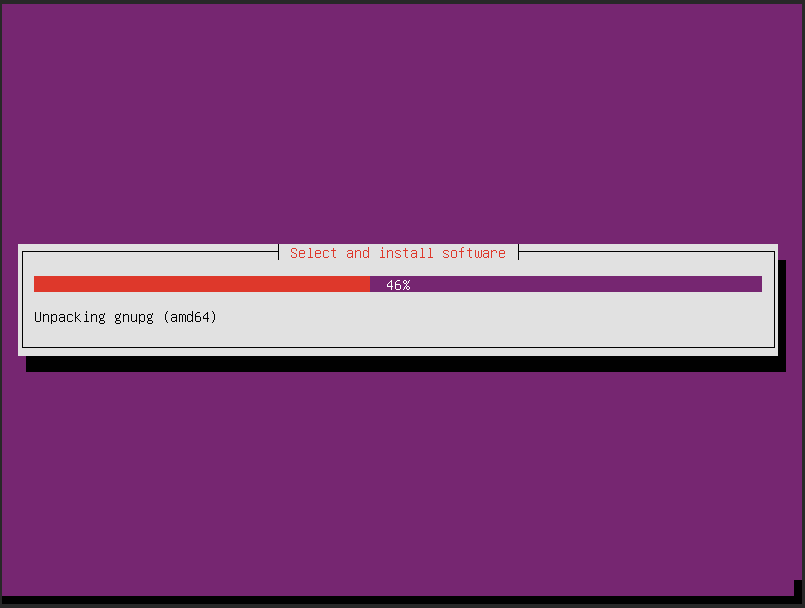
Fortunately, you can select "Configure network manually" and set a static IP address like we did with the container above. Be aware that Proxmox does not act as a DNS server either, so you will need to change the suggested IP. You can either use the upstream DNS provider (if on a local network) or a public DNS provider e.g. Cloudflare (1.1.1.1), Google (8.8.8.8) or OpenDNS (208.67.222.222). After this is configured, installation should proceed as normal.
[](https://docs.sam.uk.com/uploads/images/gallery/2021-03/image-1615760895196.png)
#### Port forwarding to the guests
Our guests are now connected to the internet via a NAT network. Our Proxmox node is acting as the router, allowing packets originating from guests to reach the external hosts. But what about incoming traffic? For this, we must utilise the **prerouting** function of iptables.
##### Creating a port forward rule
In this example, we want to forward TCP port 20022 on our Proxmox node to TCP port 22 on 10.10.10.200 (the Ubuntu CT created earlier). 192.168.1.253 is our Proxmox node's "external" IP address:
```C
iptables -t nat -A PREROUTING -d 192.168.1.253/32 -p tcp -m tcp --dport 20022 -j DNAT --to-destination 10.10.10.200:22
```
To do the same but with a restriction on which source IP addresses are allowed, include the -s flag with the allowed address in CIDR format (1.1.1.1/32 is used in this example):
```C
iptables -t nat -A PREROUTING -s 1.1.1.1/32 -d 192.168.1.253/32 -p tcp -m tcp --dport 20022 -j DNAT --to-destination 10.10.10.200:22
```
TCP ports 22 (SSH) and 8006 (HTTPS) are used for managing Proxmox. If you specify either of these ports as the "external" port, you will risk losing access to your node! Proxmox's SSH port can be changed, but the HTTPS port is fixed.
##### Testing TCP port forwards with telnet
In the above example, we forwarded a TCP port. Telnet is great for quickly testing whether TCP ports are open. To test a port, enter telnet followed by the IP address or hostname, followed by the port number:
```C
telnet 192.168.1.253 20022
```
If the port forward is working as intended, you should see an output similar to this:
```Lua
Trying 192.168.1.253...
Connected to 192.168.1.253.
Escape character is '^]'.
SSH-2.0-OpenSSH_8.2p1 Ubuntu-4
```
##### Listing active port forwards
After adding the iptables rule, list all prerouting rules:
```shell
iptables -t nat -v -L PREROUTING -n --line-number
```
Running this command should provide an output similar to below:
```C
Chain PREROUTING (policy ACCEPT 11 packets, 592 bytes)
num pkts bytes target prot opt in out source destination
1 0 0 DNAT tcp -- * * 0.0.0.0/0 192.168.1.253 tcp dpt:20022 to:10.10.10.200:22
```
##### Deleting a port forward rule
Removing iptables prerouting rules is very simple. Instead of -A (Add), we will use -D (Delete). Specify a line number from the previous output (1 is used in this example):
```shell
iptables -t nat -D PREROUTING 1
```
Then, list all of the rules again - this will confirm that it has been removed:
```C
root@pve:~# iptables -t nat -v -L PREROUTING -n --line-number
Chain PREROUTING (policy ACCEPT 0 packets, 0 bytes)
num pkts bytes target prot opt in out source destination
```
# Importing Hyper-V VHDX files in Proxmox
Test
# Fixing Proxmox node stuck in "wait_for_agent_lock"
\--
# Provisioning a Cloud-Init VM
Proxmox allows you to create both Virtual Machines via QEMU, and Containers via LXC. Out of the box, LXC containers are much easier to provision, you download the template, create the CT and specify the username, password & IP address. Virtual machines take longer to provision, but are much more flexible in usage. One big benefit is live migration without downtime. A container must be restarted when migrating to a different node.
Cloud-Init is a feature that will speed up deployment of Linux-based virtual machines, allowing you to provision a VM as quickly as a CT. This guide will assume that you already have a Debian or [Ubuntu Server](http://cdimage.ubuntu.com/ubuntu-legacy-server/releases/20.04.1/release/ubuntu-20.04.1-legacy-server-amd64.iso) guest installed inside a virtual machine, and that you have OpenSSH server installed.
#### Logging into the virtual machine
##### Confirming the IP address
If you are using DHCP, you may need to confirm which IP address has been given to the Virtual machine. To do this, log into the CLI and run the following command:
```shell
ip a
```
This should give an output similar to below. The address we are interested in is the **inet** address listed below **ens18.** In this case, the address is **192.168.1.187**
```HTML
1: lo: mtu 65536 qdisc noqueue state UNKNOWN group default qlen 1000
link/loopback 00:00:00:00:00:00 brd 00:00:00:00:00:00
inet 127.0.0.1/8 scope host lo
valid_lft forever preferred_lft forever
inet6 ::1/128 scope host
valid_lft forever preferred_lft forever
2: ens18: mtu 1500 qdisc fq_codel state UP group default qlen 1000
link/ether 4a:69:2e:94:d8:56 brd ff:ff:ff:ff:ff:ff
inet 192.168.1.187/24 brd 192.168.1.255 scope global dynamic ens18
valid_lft 86194sec preferred_lft 86194sec
inet6 fe80::4869:2eff:fe94:d856/64 scope link
valid_lft forever preferred_lft forever
```
##### SSH'ing into the machine
Then, ssh into your virtual machine:
```shell
ssh tempuser@192.168.1.187
```
#### Enabling root access
During the preparation process, we will need to remove the user created during installation. In order to do this, we will need to log into the virtual machine as the root user.
##### Setting the root password
Once successfully logged in, you will need to use this command to set a password for the root user. This password will be used for all VMs that use the Cloud-Init template, so it is best to use a secure one!
```shell
sudo passwd root
```
##### (Optional) Enabling root ssh access
For security reasons, root SSH access is disabled by default. To make things easier, we can temporarily enable root SSH access by modifying the OpenSSH config file:
```shell
sudo nano /etc/ssh/sshd_config
```
Add this line at the top of the file:
```shell
PermitRootLogin yes
```
Then save the file (Ctrl-S) and close Nano (Ctrl-X).
After saving the file, we will need to restart the SSH service for the changes to take affect:
```shell
sudo systemctl restart sshd
```
Now, confirm that we can SSH into the machine using the root user:
```shell
ssh root@192.168.1.187
```
#### Deleting the non-root user
Once we're logged in as root, we can remove the non-root user:
```shell
deluser --remove-home tempuser
```
You should see an output like below:
```shell
Looking for files to backup/remove ...
Removing user `tempuser' ...
Warning: group `tempuser' has no more members.
Done.
```
If you see an output like this, restart your virtual machine and try again:
```shell
userdel: user tempuser is currently used by process 1616
/usr/sbin/deluser: `/sbin/userdel tempuser' returned error code 8. Exiting.
```
We can then confirm that the user has been removed by checking the contents of /etc/passwd:
```shell
cat /etc/passwd | grep tempuser
```
If no output shows, you're good to go!
#### Installing apt packages
##### Required packages
We now need to install a couple of packages to allow the Virtual Machine to communicate with Proxmox via Cloud-Init.
```shell
apt install -y cloud-init cloud-initramfs-growroot qemu-guest-agent sudo git curl
```
##### Additional packages
At this point you now have all of the required packages, but to make the most out of a Cloud-Init VM, you should also install additional packages e.g. additional services or packages that will make your life easier! Here are some examples:
| Package name | Description |
| bmon | Bandwidth monitor graphs |
| htop | Terminal based task manager |
| iftop | Check network interface bandwidth |
| inetutils-traceroute | Traces path to a network host |
| iotop | Check disk IO usage |
| ncdu | Explore disk usage per folder |
| python3-pip | Allows installation of python3 based packages |
| screen | Detachable terminal sessions |
| tree | List contents of directories in a tree-like format |
#### (Optional) Installing Zabbix agent
If you use the Zabbix Monitoring system, installing the agent on a Cloud-Init will allow all new VMs to automatically communicate with the server.
##### Adding the Zabbix repository
The Zabbix agent packages included in most distributions aren't up to date. To download the newest version, visit the [Zabbix website](https://www.zabbix.com/download) and select the appropriate distribution. In this example, here is the command for downloading the deb for Ubuntu 20.04:
```shell
wget https://repo.zabbix.com/zabbix/5.0/ubuntu/pool/main/z/zabbix-release/zabbix-release_5.0-1+focal_all.deb
```
Once downloaded, use dpkg to install the package
```shell
dpkg -i zabbix-release_5.0-1+focal_all.deb
```
We've just installed the Zabbix repository, but we'll need to run an apt update before installing the agent:
```shell
apt update
```
##### Installing the agent
Once updated, we can install the Zabbix agent:
```shell
apt install zabbix-agent
```
##### Configuring the agent
Now, we need to modify the agent configuration file in order to tell it our Zabbix server's IP address. First, open the configuration file for editing:
```shell
nano /etc/zabbix/zabbix_agentd.conf
```
Then, find the Server= line and change the IP address to your Zabbix server's IP address:
```C
Server=192.168.1.238
```
##### Restarting the agent
For the changes to take affect, we must now restart the agent
```shell
systemctl restart zabbix-agent
```
#### Disabling root SSH access
Once you're happy with the state of your Cloud-Init VM, you can revert the changes made to the OpenSSH server configuration file. To do this, open the file for editing:
```shell
nano /etc/ssh/sshd_config
```
Then, comment out the line we added earlier. You can also remove the entire line, but commenting it out allows you to re-enable at a later date if required. The line should now look as follows:
```shell
#PermitRootLogin yes
```
After the changes have been saved shutdown the machine. We will now add the final piece of the puzzle - the Cloud-Init drive!
#### Creating the Cloud-Init drive
The Cloud-Init drive is used by Proxmox to pass through initialisation parameters - the username, password, SSH key and IP address information to the guest VM. Without it, we can't complete the process.
To add a Cloud-Init drive, go to the hardware section of the VM settings. Then click Add > CloudInit Drive
[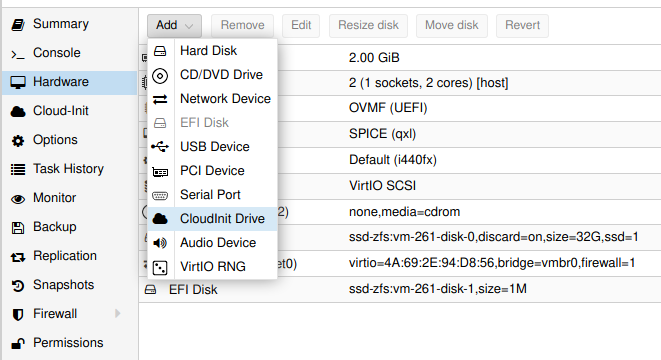](https://docs.sam.uk.com/uploads/images/gallery/2021-04/image-1618515031607.png)
In the Create Window, choose the storage pool that you'd like to use for the CloudInit drive, then click Create.
[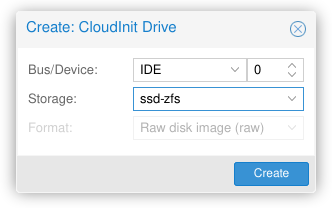](https://docs.sam.uk.com/uploads/images/gallery/2021-04/image-1618515144671.png)
#### Setting the Cloud-Init parameters
Now that we have a CloudInit drive, we can go to the Cloud-Init section and populate the fields:
[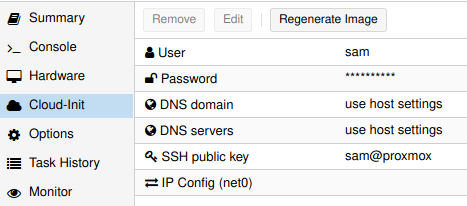](https://docs.sam.uk.com/uploads/images/gallery/2021-04/image-1618515379183.png)
Under the IP config section, specify a Static IP address in CIDR notation (/24 for most home networks). Cloud-Init does support DHCP but currently [encounters a bug](https://serverfault.com/questions/941891/dhcp-conflicts-on-two-ubuntu-18-04-servers) where cloned VMs receive the same DHCP address.
[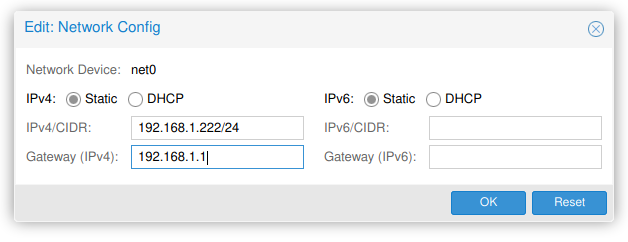](https://docs.sam.uk.com/uploads/images/gallery/2021-04/image-1618515352452.png)
#### Cloning the VM
After all Cloud-Init parameters are set, we can clone the Cloud-Init VM and give it a different VM ID and name.
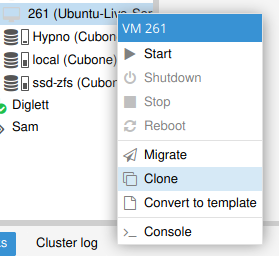
To clone the VM, right click on it and select Clone
[](https://docs.sam.uk.com/uploads/images/gallery/2021-04/image-1618515773057.png)
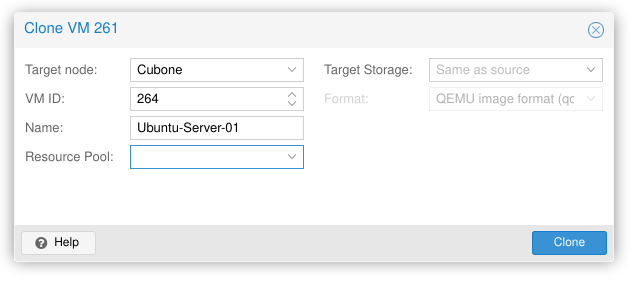
In the dialog box, set the ID and name for the new VM. Cloud-Init will use the name as it's hostname, so make sure this is unique and relates to the intended purpose of the VM.
#### [](https://docs.sam.uk.com/uploads/images/gallery/2021-04/image-1618515815005.png)
#### Regenerating the image
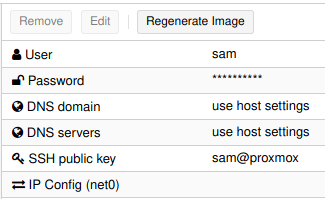
On the new VM, go to the Cloud-Init tab and click Regenerate Image. This will tell the guest VM to re-initialise with the chosen hostname, user & IP address
[](https://docs.sam.uk.com/uploads/images/gallery/2021-04/image-1618515966639.png)